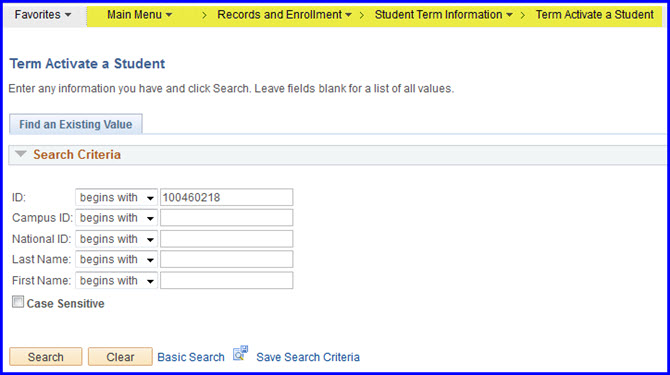
Use the Term Activate a Student interface to search for and view term activation records, as well as to add a student in cases where his or her term is not already active.
Topics covered on this page include:
The Term Activation Record's Purpose
How to View a Term Activation Record
How to Add a Term Activation Record
The Function of the Eligible to Enroll Check Box
Term Activating a Second (Third, Fourth . . . ) Bachelor's Degree Student
How to Assign an Enrollment Appointment
For information on how to view a student's residency status, refer to the View a Student's Residency Status topic.
Navigation
Main Menu>Records and Enrollment>Student Term Information>Term Activate a Student
The Term Activation Record's Purpose
The term activation record captures information about a student that is specific to a term:
- The student's career and level at the start of the term-freshman, for example;
- The student's level at the end of the term- freshman, or perhaps sophomore if he or she has accrued enough hours.
Enrollment appointments are attached to the term activation record. All of the classes tied to a specific career are used to calculate academic statistics for the career (the hours attempted, hours earned, quality points, and GPA). So, if the student is term active as an undergraduate and takes graduate courses, all the courses, both graduate and undergraduate, count toward the undergraduate career unless an internal credit transfer is performed.
How to View a Term Activation Record
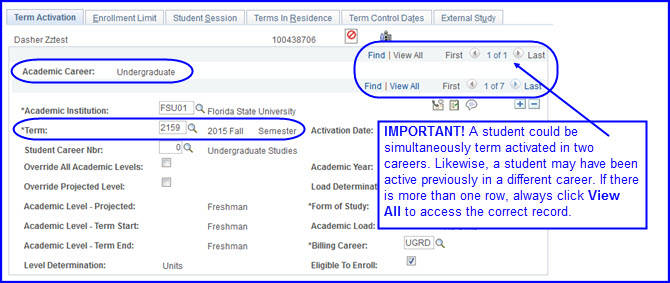
The term activation record appearing in this image is for an undergraduate student for Fall 2013. Each term of enrollment has such a record. In this case, the student has only one term record.
NOTE: A term activation record must be present for a specific term in order for the student to register for that term.
How to Add a Term Activation Record
WARNING! Before adding a term activation row, confirm:
- that the student is eligible to enroll, meaning he or she is not required to go through readmission, judicial processing, etc;
- that you are viewing the correct student and the correct career for that student. Remember to look first for another row indicating anther career before adding an additional career.
- Adding term activation rows for the wrong career creates unnecessary and difficult cleanup work!
1. Click the Plus (+) button to add a row.
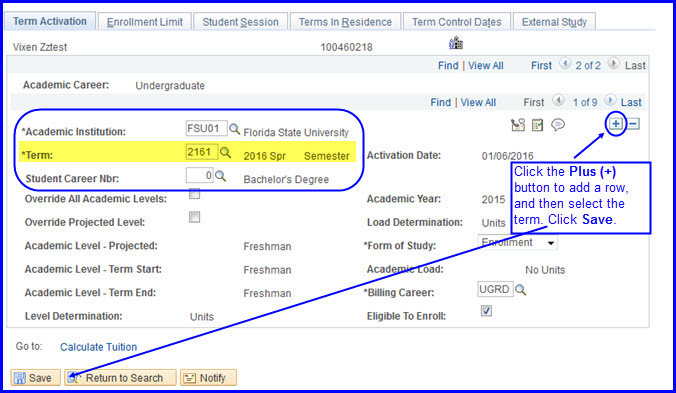
2. Select the appropriate Term. The Student Career Nbr field auto-populates.
NOTE: In the case of a student with two program/plan stacks in the same career, set up the term activation record based on the lowest career number for an active stack within that career. For example, an undergraduate with two stacks that have career numbers 0 and 1 respectively is term activated based on the 0 stack.
3. Click Save. The student is now active for the selected term.
CAUTION! Do not change any other fields on this or other tabs unless specifically directed to do so.
The term activation process checks the program/plan stack to determine if the student will term active for the semester in question. If the stack is not active for the term in question, an error message similar to one of those pictured below appears.
Check the program/plan stack. Adjustments may be required if the student should be active, or the wrong career or term might have been selected for the term activation process. If an error message like one of these appears while term activating a student, stop and investigate.
This error displays when trying to term activate a student earlier than his or her stack is active:

This error displays when trying to term activate a student later than his or her stack is active:

The Eligible to Enroll Check Box-the Master On/Off Switch
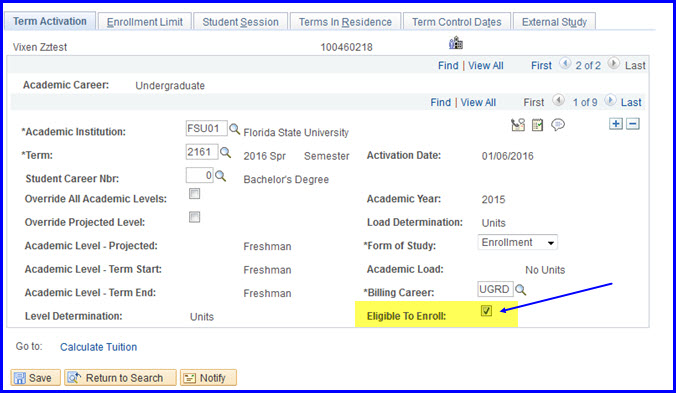
The Eligible To Enroll check box is selected by default; however, certain processes may clear it. For example, students who do not pay tuition by the deadline are not eligible for enrollment, and the check box is clear in this case. After tuition payment is confirmed, reinstatement is made official by selecting this check box.
IMPORTANT! If someone can't register, troubleshoot by first ensuring the individual is term active AND that the Eligible To Enroll check box is selected.
Term Activating a Second (Third, Fourth . . . ) Bachelor's Degree Student
If a student completes his or her first bachelor's degree and is starting a second bachelor's degree, the Academic Level - Projected field requires updating.
NOTE: Similar exceptions occur for law and medicine (MD degrees) students. Levels are used to track the medicine cohort or the exact year of law school a student is in. Law levels are set manually by the College of law. Medical students' levels are set based on hours, but may require occasional adjustment for individual students.
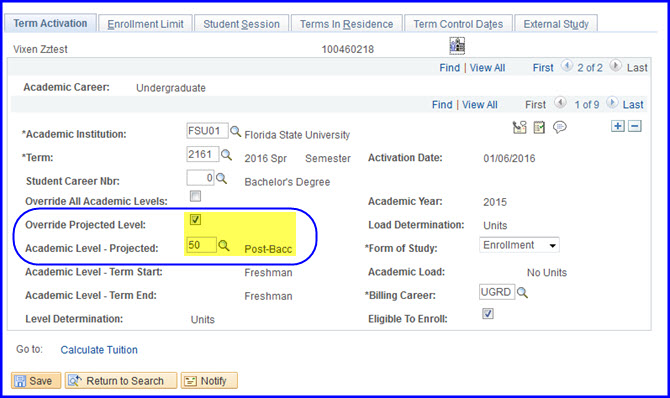
1. Select the Override Projected Level check box.
2. Use the Academic Level - Projected Look Up to select the Post-Bacc level.
3. Click Save.
WARNING! Set the Academic Level - Projected field on the term activation record for the first term (start of second degree) that the student is officially a post-baccalaureate student (or law/med years). Financial aid uses the projected level and beginning of term (BOT) level fields for their calculations.
How to Assign an Enrollment Appointment
1. If the student is going to register for classes, navigate to Main Menu>Records and Enrollment>Term Processing>Appointments> Student Enrollment Appointment.
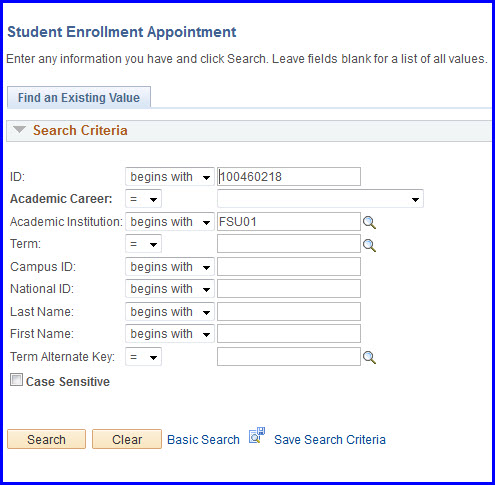
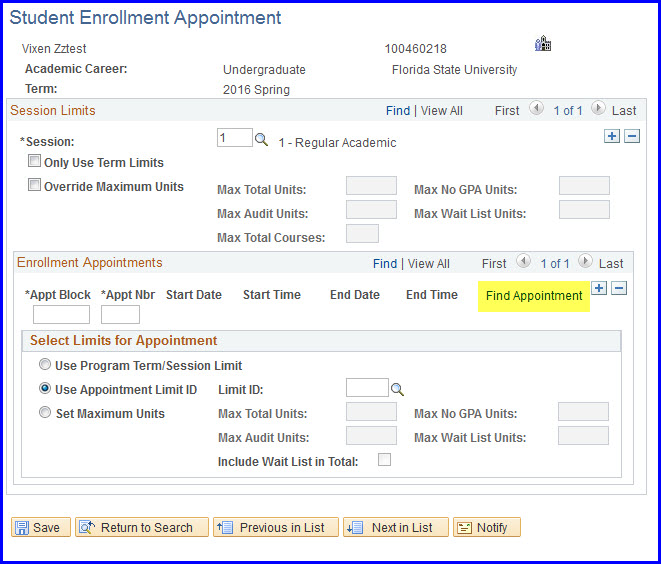
2. Click Search. When the Student Enrollment Appointment page appears, click the Find Appointment link.
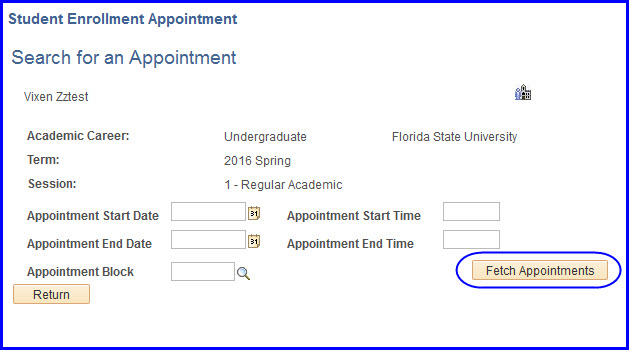
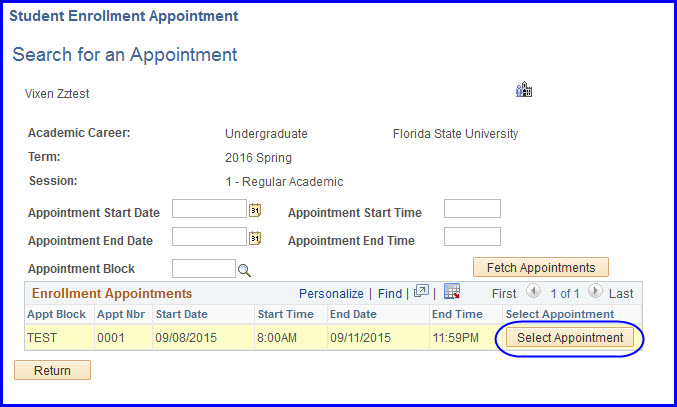
3. The Search for an Appointment page appears. Click the Fetch Appointments button.
4. A list of enrollment appointments appears. Click the Select Appointment button next to the appropriate appointment block.
5. You are returned to the Student Enrollment Appointment page. The Enrollment Appointments values are populated; the student now has an active enrollment appointment.
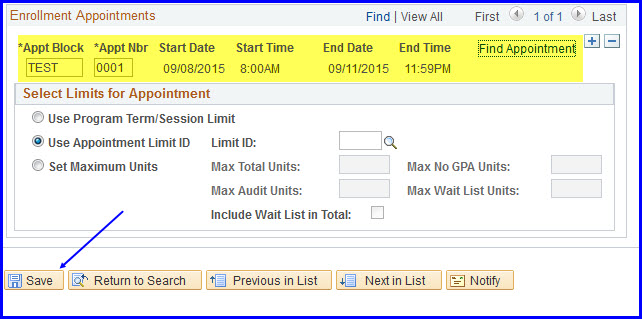
6. Click Save.
