
Student petition for a withdrawal at various points in the semester for various reasons. Detailed below are evaluations that should be made when processing a withdrawal.
If it is prior to the beginning of the semester, including the first four days of the drop/add period, perform an administrative cancellation to remove classes and fees from a student's schedule.
After the fourth day of classes (or for any previous semester) perform a withdrawal to update a student's schedule.
IMPORTANT! Even if you are withdrawing a student from a class/es in the current semester, always ensure that a grade/s was not already assigned. If a grade is associated with the class/es in question, you must first remove it, or change it to a W or WD value, depending on the student's circumstances. The process of posting the withdrawal as described below does not remove already-assigned grades. Jump to the bottom of this topic to review how to change grades prior to performing a withdrawal.
Navigation
Log on to your portal at www.fsu.edu. Under the myFSU Links area, click the SC icon. Navigate to Main Menu>Records and Enrollment>Student Term Information>Term History.
Posting a Withdrawal
1. Remember to check for grades before taking the steps below. After navigating to the Term History page, provide either the student's Empl ID in the ID field, or the student's name in the First Name/Last Name fields. Click Search.
2. When the student's record appears, click the Term Withdrawal tab.
IMPORTANT! Ensure that the correct career and the correct term are selected.

3. In the Withdrawal\Cancel drop-down box, choose a value.
NOTE: If the calendar date is prior to the beginning of the semester, or during the first four days of the drop/add period, choose Cancelled. If the calendar date is after the drop/add period, choose Withdrew.
4. In the Withdrawal\Cancel Reason drop-down box, choose a value.
5. Select a date value for the Withdrawal\Cancel Date field.
NOTE: This date is the date on which the withdrawal or cancellation is processed.
6. In the Last Date of Attendance field record the last date on which the student attended classes (this is the effective date listed on the withdrawal form).
7. Click the Post Term Withdrawal button. If the withdrawal is successful, a Success link appears.

8. Click the link to see a Term Withdrawal Run Status report. The report reflects the withdrawal details (the student's name, the Term Withdrawal Request ID, reason, dates, etc.) as well as a Message Log containing an explanation message.
9. Click the Success link. The Term Withdrawal Run Status page appears.
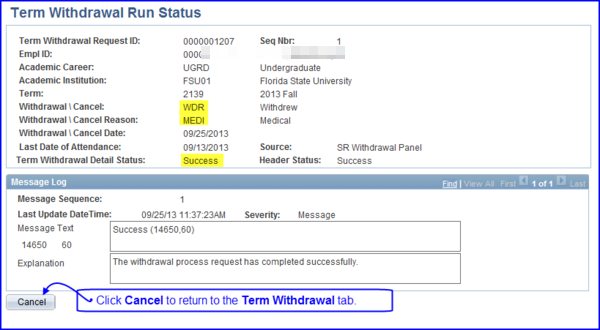
10. Click Cancel to return to the Term Withdrawal tab.
11. After being returned to the Term Withdrawal tab, click Return to Search to return to the Term History-Search Criteria page.
Adding/Changing Grades Prior to Posting a Withdrawal
Navigate to Main Menu>Records and Enrollment>Enroll Students>Quick Enroll.
Depending upon the circumstances of the withdrawal, it may be necessary to add a grade of W, WD, or to change or remove an existing grade.
1. On the Quick Enroll a Student Page, ensure the Add a New Value tab is active. Enter the student's ID, Academic Career, Academic Institution, and Term.
2. Click Add. The Quick Enrollment page appears.
NOTE: Click the Show all columns button to display editable columns.
3. After navigating to Quick Enroll, click the Study List link to see if the student has grades assigned for the class/es.
4. Make a note of the Cls # for the class/es that requires updating and click Cancel to return to the Quick Enrollment page.
5. Click the Action drop-down box and select Add Grd, Change Grd, or Remove Grd based on the circumstances.
NOTE:
- Select Add Grd if a grade wasn't recorded and the student should have either W or WD appear on the transcript for the class.
- Select Change Grd if a grade was recorded but must be changed to a W or WD.
- Select Remove Grd if any grade value appears that should be removed and not replaced by another grade on the transcript (for example, NG, B, 74, PM, etc.).
6. If in step #5 Add Grd was chosen, add the correct grade in the Grade Input column. If Change Grd was chosen, in the Grade Input column enter the new grade value. If Remove Grd was chosen, move to step #7.
7. Click the Create Transcript Note link and add a note if appropriate.
8. Click Submit.
9. Click Save.
10. Repeat the steps above for any other classes where the grade needs to be altered.